Flutter Bloc Counter App for Absolute Beginners
What is Bloc?
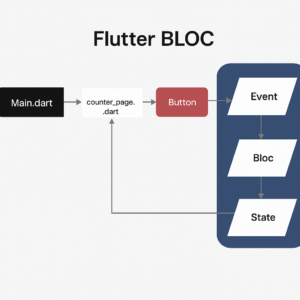
Bloc stands for Business Logic Component. It helps separate your app’s logic—like increasing or decreasing a counter—from the UI, making your code cleaner and easier to manage.
The flutter_bloc package is a popular tool that makes this pattern easy to use in Flutter. For our Counter App, we’ll use Bloc to increment and decrement the counter efficiently.
Set Up Your Project
To implement the BLoC (Business Logic Component) pattern in your Flutter project, follow these steps:
Inside the lib folder, create a new file:
main.dartcounter_screen.dart(UI that interacts with the BLoC)
Next, inside the lib folder, create a new directory called bloc:
lib/bloc/Inside the bloc folder, create the following files:
counter_bloc.dart(Handles business logic and state management)counter_event.dart(Defines user actions and events)counter_state.dart(Manages different states of the counter)
These files will hold the core components of our app. Don’t worry—we’ll explain each one in detail! 🚀
Define Events
Now, let’s talk about events. Events are like commands you send to Bloc(Simply user’s actions on the app)—things you want to happen. In our Counter app, we only need two:
one to increase the count and one to decrease it. We’ll define these in counter_event.dart.
We’ll make an abstract class as a base, then add our two specific events. They don’t need extra info—just the instruction to go up or down. Here’s the code:
The abstract class CounterEvent is like a category for all our events. IncrementEvent and DecrementEvent are the specific actions—super simple
abstract class CounterEvent {}

class IncrementEvent extends CounterEvent {}

class DecrementEvent extends CounterEvent {}
The abstract class CounterEvent is like a category for all our events. IncrementEvent and DecrementEvent are the specific actions—super simple!
Define States
Next, let’s talk about state—the data our app displays. In simple terms, state represents the final output of a particular action.
For our Counter app, the state is just a number (like 0, 5, or any count value). We need to define this in counter_state.dart.
To manage this, we’ll create a class that holds this number. The BLoC will update the state, and the UI will display it accordingly.
class CounterState {
  final int count;
  CounterState(this.count);
}
Create the Bloc
import 'package:flutter_bloc/flutter_bloc.dart';
import 'counter_event.dart';
import 'counter_state.dart';

class CounterBloc extends Bloc<CounterEvent, CounterState> {
  CounterBloc() : super(CounterState(0)) {
    on<IncrementEvent>((event, emit) {
      emit(CounterState(state.count + 1));
    });

    on<DecrementEvent>((event, emit) {
      emit(CounterState(state.count - 1));
    });
  }
}
Build the UI
import 'package:flutter/material.dart';
import 'package:flutter_bloc/flutter_bloc.dart';
import 'counter_bloc.dart';
import 'counter_event.dart';
import 'counter_state.dart';

class CounterScreen extends StatelessWidget {
  @override
  Widget build(BuildContext context) {
    return Scaffold(
      appBar: AppBar(title: Text('Counter with Bloc')),
      body: Center(
        child: Column(
          mainAxisAlignment: MainAxisAlignment.center,
          children: [
            BlocBuilder<CounterBloc, CounterState>(
              builder: (context, state) {
                return Text(
                  '${state.count}',
                  style: TextStyle(fontSize: 48),
                );
              },
            ),
            SizedBox(height: 20),
            Row(
              mainAxisAlignment: MainAxisAlignment.center,
              children: [
                ElevatedButton(
                  onPressed: () {
                    context.read<CounterBloc>().add(DecrementEvent());
                  },
                  child: Text('-'),
                ),
                SizedBox(width: 20),
                ElevatedButton(
                  onPressed: () {
                    context.read<CounterBloc>().add(IncrementEvent());
                  },
                  child: Text('+'),
                ),
              ],
            ),
          ],
        ),
      ),
    );
  }
}
Tie It All Together in main.dart
 import 'package:flutter/material.dart';
import 'package:flutter_bloc/flutter_bloc.dart';
import 'counter_bloc.dart';
import 'counter_screen.dart';

void main() {
  runApp(MyApp());
}

class MyApp extends StatelessWidget {
  @override
  Widget build(BuildContext context) {
    return BlocProvider(
      create: (context) => CounterBloc(),
      child: MaterialApp(
        home: CounterScreen(),
      ),
    );
  }
}